

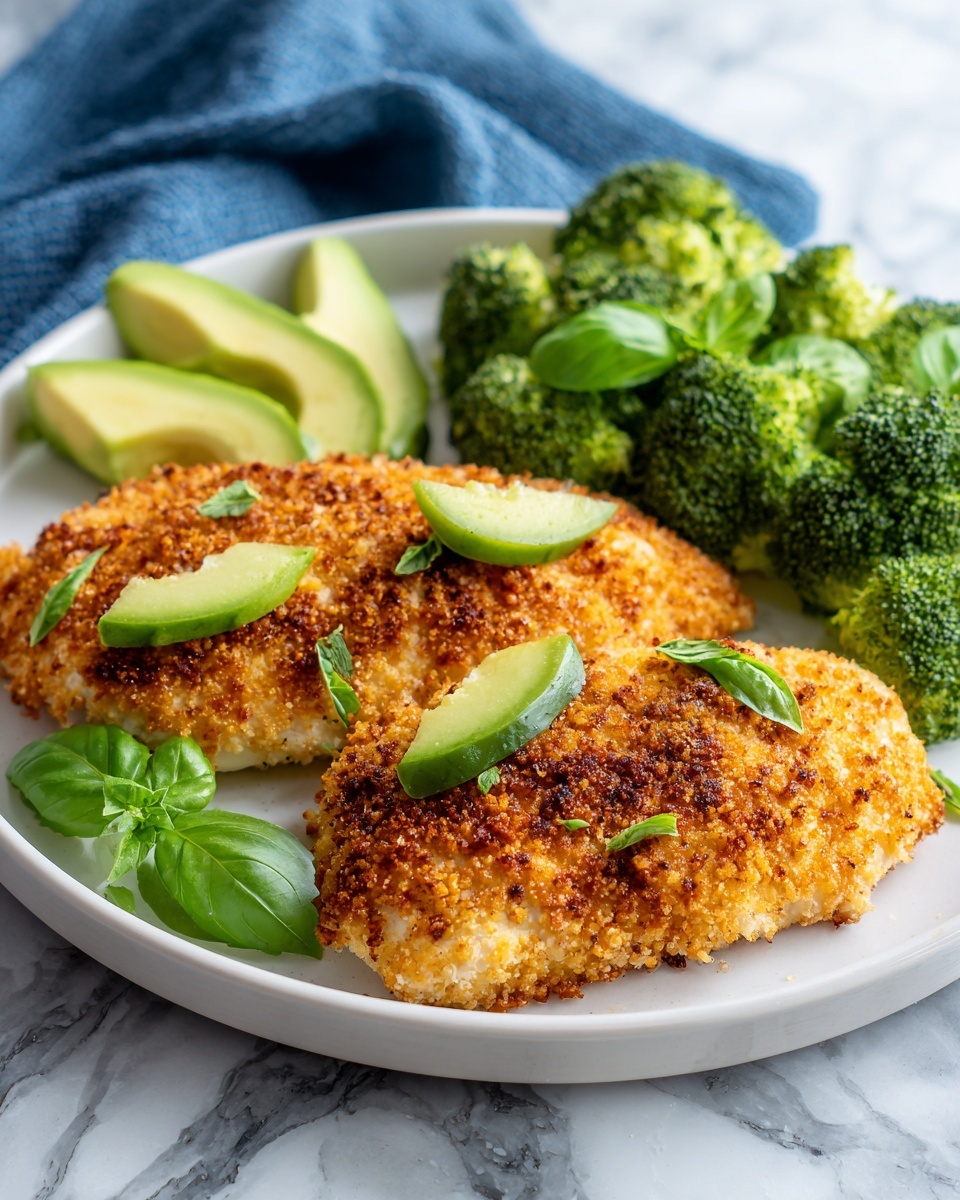
If you love bold, tangy flavors and crispy, juicy chicken, then this Dill Pickle Chicken Recipe is going to be your new favorite go-to dinner. Trust me, this isn’t just any chicken dish—marinating the chicken in dill pickle juice gives it this incredible zing and moisture that you’ll find absolutely addicting. Stick around, because I’m going to walk you through how to get that perfect crunch and flavor every time.
❤️
Why You’ll Love This Recipe
- Incredible Tangy Flavor: The dill pickle juice marinade makes the chicken juicy with a punch of bright, savory zing.
- Super Crispy Coating: A mix of breadcrumbs and panko ensures the outside gets golden and crunchy without frying.
- Easy To Prep Ahead: You can marinate overnight and even freeze the breaded chicken for quick meals later.
- Kid and Crowd Friendly: My family goes crazy for this tangy chicken – it’s a guaranteed win at dinner.
Ingredients You’ll Need
All the ingredients for this Dill Pickle Chicken Recipe are simple staples, but together they create a dish that’s anything but ordinary. Make sure to use good-quality seasoned breadcrumbs for that extra flavor boost.
- Chicken breasts: Thinly sliced or pounded thin; thinner pieces soak up the marinade better and cook evenly.
- Dill pickle juice: The secret ingredient that tenderizes and adds tangy flavor; fresh from the jar is perfect.
- Eggs: Helps the breadcrumb coating stick and adds a little richness.
- Milk: Just a splash to thin out the eggs for easy dipping.
- Seasoned breadcrumbs: Adds flavor and a flavorful crust; you can adjust seasoning if your mix is plain.
- Panko breadcrumbs: For light, flaky crispiness that really amps up the crunch factor.
- Kosher salt and black pepper: Basics to enhance flavor in the coating.
- Olive oil cooking spray: Optional but highly recommended for getting a golden finish without deep frying.
Note: You’ll find the complete list of ingredients, along with their exact measurements, in the printable recipe card at the bottom of this post.
Variations
I love keeping this Dill Pickle Chicken Recipe flexible because everyone’s tastes are a little different. Feel free to tweak it and make it your own!
- Spicy kick: Add a pinch of cayenne pepper or a dash of hot sauce to the egg mixture for a spicy twist—I tried this once and my husband couldn’t stop eating!
- Gluten-free: Swap out the breadcrumbs for crushed gluten-free crackers or gluten-free panko to accommodate diets without sacrificing crunch.
- Herb boost: Throw in some dried dill or garlic powder into your breadcrumb mix for extra flavor depth.
- Air fryer version: Instead of baking, try air frying the coated chicken to get an even crispier finish with less oil.
How to Make Dill Pickle Chicken Recipe
Step 1: Marinate that Chicken to Perfection
Place your thinly sliced chicken breasts in a resealable plastic bag, pour the dill pickle juice over them, and press out as much air as you can before sealing it up. Give the bag a gentle shake or massage so every piece soaks in that tangy juice. Pop it into the fridge for 8 to 12 hours—I usually do this overnight. I learned early on that this marinating step is non-negotiable for tender, flavorful chicken that’s bursting with pickle goodness.
Step 2: Prep the Crispy Coating
Once the chicken has soaked up all that pickle juice, carefully remove it from the bag and pat dry with paper towels. This is key to getting the coating to stick well and crisp up nicely. Toss out the leftover pickle juice. Now, whisk together the eggs and milk in one bowl, and in another, combine the seasoned breadcrumbs, panko, salt, and pepper. This dual-step keeps the breading process nice and organized.
Step 3: Coat and Bake for Crispy Goodness
Dip each chicken breast first into the egg mixture, letting any extra drip off, then dredge thoroughly in the breadcrumb mix. I like to gently press the crumbs into the chicken to really lock in that coating. Arrange the breaded chicken on a parchment-lined baking sheet—or better yet, on a wire rack set inside a rimmed pan for even crisping all the way around. Give them a light spritz with olive oil cooking spray to help everything brown beautifully in the oven.
Bake at 425°F for 10 minutes, then flip each piece and bake for another 8 minutes or so. The goal is golden brown perfection and an internal temperature of 165°F. If you have a meat thermometer, now’s the time to use it—it takes the guesswork out. I discovered that flipping at 10 minutes is crucial; otherwise, one side cooks way more crisp than the other.
👨🍳
Pro Tips for Making Dill Pickle Chicken Recipe
- Marinate Overnight: I found the longer marinade time makes a huge difference for tenderness and flavor—don’t skip this step.
- Dry Chicken Thoroughly: Patting it dry before breading is the trick to a crisp, even coating that sticks.
- Use a Wire Rack if Possible: Elevating the chicken lets hot air circulate so both sides get crispy instead of soggy on the bottom.
- Watch Cooking Time Carefully: Overbaking dries out the chicken; use a thermometer to know when it hits perfectly cooked.
How to Serve Dill Pickle Chicken Recipe

Garnishes
For garnishes, I keep it simple yet fresh—some chopped dill or parsley adds a lovely herbal touch that echoes the pickle flavor. A squeeze of fresh lemon juice right before serving also brightens things up and cuts through the richness wonderfully.
Side Dishes
This chicken pairs beautifully with creamy mashed potatoes or a tangy coleslaw—both help balance the crisp and tangy chicken. I also like serving it alongside steamed green beans or a crunchy cucumber salad to add freshness and texture contrasts.
Creative Ways to Present
For a fun party platter, slice the dill pickle chicken into strips and serve with a side of ranch or a spicy aioli for dipping. I once served it on toasted sandwich rolls with lettuce and tomato for an epic picnic sandwich that disappeared in minutes!
Make Ahead and Storage
Storing Leftovers
I store leftover dill pickle chicken in an airtight container in the fridge and it stays tasty and juicy for up to 4 days. Just be sure to cool it completely before sealing so moisture doesn’t make the coating soggy.
Freezing
One of the best tricks I learned is to bread the chicken but freeze it before baking. Pop the coated pieces in a freezer bag, and they keep up to 3 months. When you’re ready, bake them straight from frozen, adding a few extra minutes to the cooking time. It’s a real lifesaver for busy weeks!
Reheating
To reheat leftovers, I prefer the air fryer at 375°F for 3 to 5 minutes to bring back the crunch. If that’s not an option, microwaving in short 20-second bursts works, but the coating won’t stay crispy. The air fryer method really revives that fresh-baked texture.
FAQs
-
Can I use chicken thighs instead of breasts in this Dill Pickle Chicken Recipe?
Absolutely! Chicken thighs are more forgiving and stay juicy, but they may need a slightly longer baking time. Just make sure they’re trimmed and patted dry well before breading for the best results.
-
Is it necessary to marinate the chicken overnight?
While you can marinate for as little as 2 hours, I highly recommend aiming for 8 to 12 hours. This gives the pickle juice enough time to tenderize and infuse the chicken with flavor, making a noticeable difference in taste and texture.
-
Can I make this recipe gluten-free?
Yes! Just swap out the regular breadcrumbs and panko for your favorite gluten-free versions. The method stays the same and you still get that amazing crispy coating.
-
How do I prevent the coating from getting soggy?
Patting the chicken dry before breading is crucial. Also, baking on a wire rack rather than directly on a baking sheet helps air circulate and keeps the coating crisp on all sides.
Final Thoughts
I absolutely love how this Dill Pickle Chicken Recipe turns out every time—crispy, tangy, and perfectly juicy. It’s become one of those dishes I reach for when I want something quick but special, and I know my family will gobble up. Give it a try; I promise you’ll be hooked on that pickle juice magic like I am!
Print
Description
Dill Pickle Chicken is a flavorful and juicy baked chicken dish marinated in tangy dill pickle juice, then coated with a crispy seasoned breadcrumb and panko crust. This recipe offers a delightful combination of savory and briny flavors, perfect for a quick yet impressive weeknight meal.
Chicken and Marinade
Breading
Finishing
- Marinate the chicken: Place the thinly sliced chicken breasts and dill pickle juice into a ziplock bag. Remove as much air as possible and massage the bag gently to ensure the chicken is fully coated in the pickle juice. Refrigerate and marinate for 8 to 12 hours to infuse the chicken with tangy flavor.
- Prepare the chicken: After marinating, remove the chicken from the pickle juice and pat dry thoroughly with paper towels to remove excess moisture. Discard the leftover pickle juice. This step helps the breading adhere better and promotes crispiness.
- Preheat the oven and prepare the baking sheet: Set your oven to 425°F (220°C). Line a large baking sheet with parchment paper or place a wire cooling rack over a rimmed baking pan. The rack option allows air circulation around the chicken for an extra crispy crust.
- Mix the wet and dry coating: In a medium bowl, whisk together the eggs and milk. In a separate large shallow bowl, combine the seasoned breadcrumbs, panko bread crumbs, kosher salt, and black pepper.
- Bread the chicken: Dip each chicken breast first into the egg and milk mixture, then thoroughly coat with the breadcrumb mixture, shaking off any excess crumbs to prevent clumping.
- Arrange and oil: Place the breaded chicken breasts onto the prepared baking sheet or wire rack. Lightly spray both sides with olive oil cooking spray to enhance browning and crispiness during baking.
- Bake the chicken: Bake the chicken in the preheated oven for 10 minutes. Carefully flip each piece and continue baking for an additional 8 minutes. Cook until the chicken reaches an internal temperature of 165°F (74°C) and is golden brown on the outside.
Notes
- Storage & Reheating: Store cooked chicken in an airtight container in the refrigerator for up to 4 days.
- Freezing: Bread the chicken but do not bake it before freezing. Place in a large freezer bag and freeze for up to 3 months.
- Reheating: Reheat using a microwave in 20-second increments until warm or use an air fryer at 375°F for 3-5 minutes to restore crispiness.
Nutrition
- Serving Size: 1 chicken breast (approximately 6 oz)
- Calories: 350 kcal
- Sugar: 2 g
- Sodium: 650 mg
- Fat: 10 g
- Saturated Fat: 2 g
- Unsaturated Fat: 7 g
- Trans Fat: 0 g
- Carbohydrates: 25 g
- Fiber: 2 g
- Protein: 38 g
- Cholesterol: 140 mg


")